Wireless Help
This page is designed to help you set up and configure a wireless network connection for a laptop computer. Outlined are four easy steps to follow that will assist you in successfully connecting to a Penn State network from the HUB or Sackett/Engineering Units. These steps are: 1) Install the wireless network card. 2) Configure the wireless network card. 3) Connect to a Penn State network. 4) Run the VPN (Virtual Private Network). For clarity, each step begins and ends with a horizontal rule.
The COE (College of Engineering) wireless coverage area has been expanded recently. Buildings such as Hammond, Sackett, EE West, Reber and Units A and B are now covered. Coverage can also extend outside. A directional access point is located in Sackett which enables connections on Old Main lawn. If the signal is strong enough, you may also be able to connect in places such as Foundry Park, Starbucks and Café 210.
Click here to see a map of some of the covered buildings. Click here to see a detailed list of building coverage including ip addresses, coverage areas and authentication method.
STEP 1: Installing the wireless network card
The first thing you need is the wireless network card, which plugs right in to the laptop. These are available in stores or can be borrowed from the AE computer lab in limited numbers for a certain period of time (contact Paul Bowers or John Pillar). Once you have the card, read the instructions carefully to set up the wireless connection (see below for help or click here to download a sample installation guide).
Here are a few easy steps to help you install the wireless card correctly (using a D-Link card with WindowsXP for example):
1. Insert the CD into the computer BEFORE you put the card in. Click Install Driver/PC Utility.
2. You can choose where you want to install the program, or accept the default location. Click Next until you are prompted that the installation has completed. If the computer asks to be restarted, choose to restart it later.
3. Shut down your computer and install the card. After you have done this, turn the computer back on (do not install the card while the computer is still running, as doing so results in an incomplete installation).

4. When the computer turns back on, a Found New Hardware Wizard will appear. Select Install the Software Automatically. Continue past the installation alert by clicking Continue Anyway and click Finish when the wizard has completed.
If installation was successful, the wireless utility will automatically start in the system tray (lower right part of the screen). If it does not, double click the shortcut that appears on the desktop. If you see the icon, the card has been correctly installed and the wireless network card is looking for a wireless connection (for connections at Sackett, Hammond, Reber, EE West or the Engineering Units, the network is called COE).
STEP 2: Configuring the wireless network connection
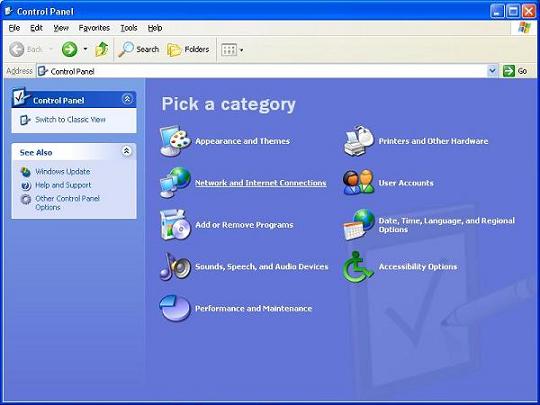
1. Now that the wireless utility
is installed, connecting to the internet is easy. To connect
to Penn State, you will need to configure your wireless network
connection to obtain an IP address automatically (this is called
a DHCP connection). To do this, go to Control
Panel and select Network and Internet
Connections:
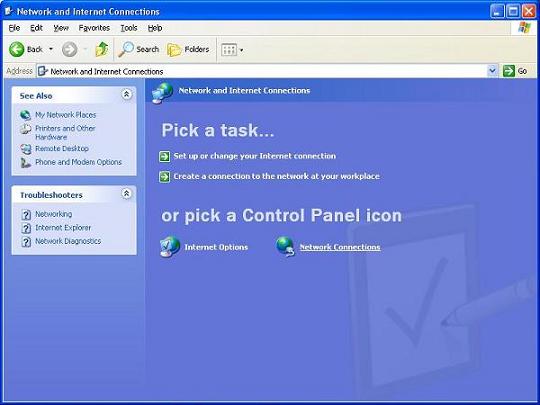
2. Next select Network
Connections:
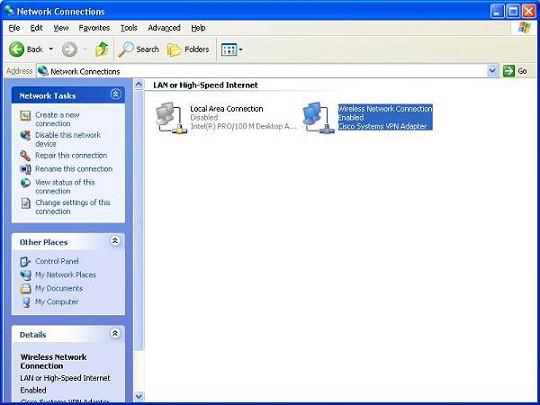
3. Right click on the new Wireless
Network Connection icon and select Properties:
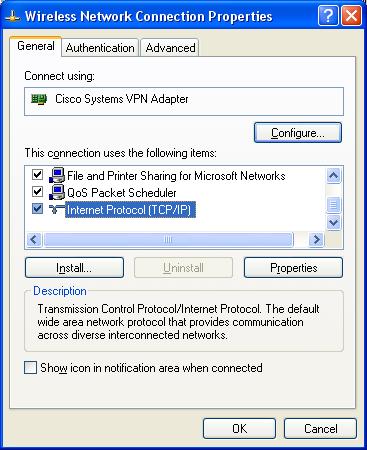
4. In the General
tab, find This connection uses the following
items: and double click Internet
Protocol (TCP/IP):
5. Click the DHCP radio buttons
(Obtain an IP address automatically
and Obtain DNS server address automatically):
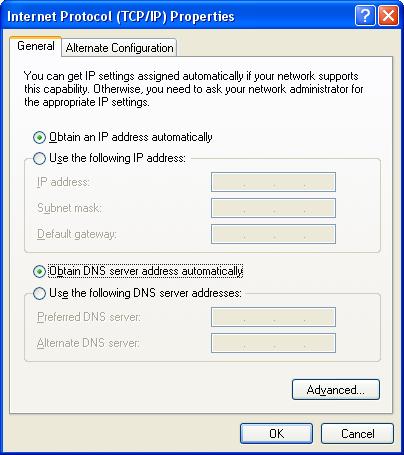
6. Click OK twice. Your wireless connection is now configured for a DHCP server. Howerver, this does not mean that you are connected to a network yet. The next set of instructions will help your wireless card recognize the Penn State network.
STEP 3: Connecting to the Penn State network
1. For basic users, Windows can
adeqately manage your wireless network settings (advanced users
can download a wireless manager from the O:\ drive called WinNc
under the wireless folder for more features, but be sure not
to use Windows to configure you wireless network settings).
Repeat STEPS 1-3 above in CONFIGURING THE WIRELESS NETWORK CONNECTION
(go to Control
Panel>Network and Internet Connections>Network
Connections>Right click on Wireless
Network Connection>Properties).
When the Properties box opens,
select the Wireless Networks tab.
Check the Use Windows to configure my
wireless network settings box (make sure there is a check
in the box):
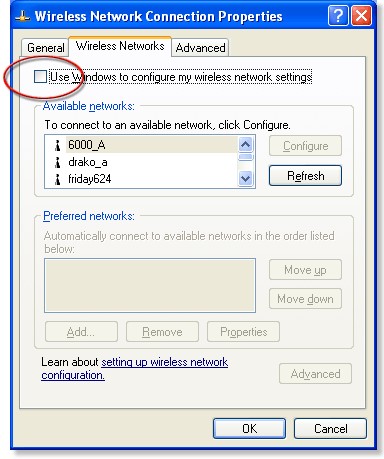
2. Click OK.
Once you have completed these steps, right click on the Wireless
Network Connection blinking computers icon in the system
tray (lower right of the screen) and select View
Available Wireless Networks. The COE
network should appear as an Available
wireless network if you are in its range
which would include areas near Sackett, EE West, Hammond, Reber
or the Engineering Units. To connect at the HUB, select the
appropriate wireless network for that environment.
Your wireless network list should look like this:
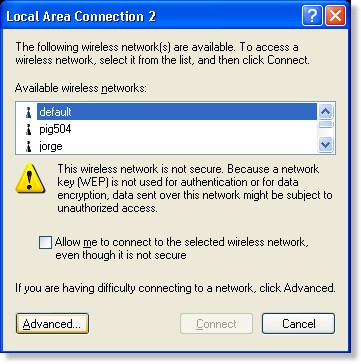
Once you have selected a network, click the Allow me to connect to the selected wireless network, even though it is not secure button and click Connect. Shortly, a window should pop up from the system tray icon notifying you that the wireless connection has been made. It will also indicate the signal strength and the name of the network.
STEP 4: Configuring VPN or WPA
VPN
Now that your computer and the
wireless network are "talking," you will need to run
a program called a VPN (Virtual Private Network) in order to
be authenticated (if you are attempting to connect to COE or
at the HUB). The VPN is just a program that identifies your
computer to the PSU network. You will let the VPN run for as
long as you are connected wirelessly. When you are done, simply
exit the program. Without running the VPN, you cannot access
the internet. However, avery nice feature about the COE's VPN
is that you can access the download site without actually running
the VPN. The site's URL is: http://www.engr.psu.edu/vpn. This
means that you don't have to first save it to a CD and then
install it on your computer.
Click here to download the VPN client or click here to visit our VPN Help page. This will allow you to securely connect to the PSU server and navigate the internet. If you are connecting wirelessly at any of the buildings that are covered in the COE network, you will need to run the COE_wireless_mobility profile. If you are connecting wirelessly at home, you need to run the ISP_to_COE profile. If you are connecting at the HUB, you will need to run the ITS Wireless at UP profile. A list of profiles and their purposes can be found here at the VPN help site.
WPA
WPA is similar to the VPN client but allows windows XP with SP2 to connect to "COE-WPA" securely using wireless
without a third party software such as the VPN Client. Since it's Windows based, it will save your
password and connect automatically, and securely, to the network when it is available. This will also makes it
possible to connect to the COE network from anywhere wirelessly on campus by first connecting wireless
to PSU-WPA (when available), then connecting the VPN Client to "COE_from_ISP". To take advantage of the
new WPA security, download the software here: http://www.engr.psu.edu/wpa/.
Additional questions:
If you have any questions that were not addressed or answered sufficiently, please go to our lab assistants page and contact one of the assistants.