|
|
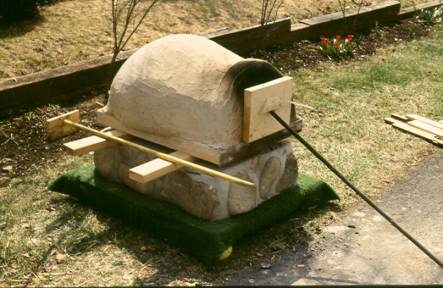
The Bread Oven: Symbol of Colonial Liberty/A Large Clay Oven
Gregory R. Ziegler, Penn State Food Science
Building the Base
In most cases you will not want to build this oven at a permanent site. Therefore, we suggest building it on a wooden platform. To avoid excessive weight, we also suggest that the base be made of a hollow wooden box, faced with stone for effect, and separate from the oven itself.
You will need:
- A wooden platform (a pallet is ideal)
- 2- 1” X 10” X 8” Pine boards
- 3- 2” X 2” X 8” Pine boards
- Nails or screws
- Carpet staples or tacks
- Quick-drying, heavy-duty contractor's glue (with a caulking gun)
- A piece of artificial turf carpeting about the size of the pallet
- Enough medium sized flat stones to cover the sides of the base and 1-40# bag of mortar, or
- Preformed facia stone and mortar
Using the 1" X 10"s and 2" X 2", construct a box (eaving the top and bottom open) approximately 2' X 4'.
Attached the box to the pallet from the underside with nails or screws.
Onto the top of the pallet, around the outside of the box, fix the artificial turf to the pallet using staples.
If using natural stone, glue the stones on the outside of the box being careful not to let any stone protrude above the top of the box. Allow the glue to dry, then mix the mortar and point between the stones. If using preformed facia stone, follow the manufacturer's directions for its application. Use as thin a layer of stone and mortar as possible, as this adds considerable weight to the oven.
Building the Oven
You will need:
- 2- 1” X 4” X 8' Pine boards
- 1- 40# bag of Quickcrete® (or similar product)
- Small galvanized window well (for the door opening)
- Plastic drop cloth
- Thin, flat hearth stone about 18” square.
- Thin, flexible wooden strips (about 1" wide, 1/8"
thick and 48" long) or flexible green branches (about 1/2"
thick).
- 3/4" Plywood (about 4' X 4')
- 80# of dry white earthenware clay (see the art teacher), or you
can dig clay yourself locally)
- Water
- A bale of straw
- A mold for making 4” X 4” X 8” bricks (use an appropriate bread
pan or make a wooden one yourself)
- 12” of 1-2” I.D. pipe (optional for vent)
- A bread pan (for a brick mold)
- A large disposable aluminum roasting pan.
- A hoe.
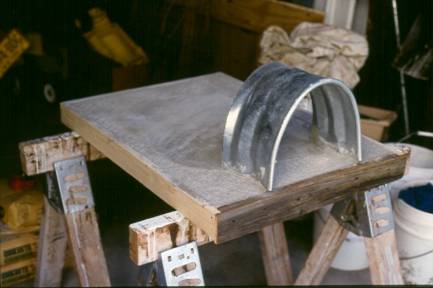
The Hearth
- Build a frame of the same dimensions as your base (about 2' X 4') using the 1" X 4" boards. Set the frame on a flat surface covered with a plastic drop cloth.
- Mix the concrete, and poor into the frame.
- If desired, set a flat hearth stone into the concrete.
- Form the window well into the shape of a door opening (this usually requires making it narrower between the flanges), and straighten out the flanges.
- Imbed the window well flanges into the concrete making sure to center it at one end of the frame.
- Allow the concrete to set.
|
|
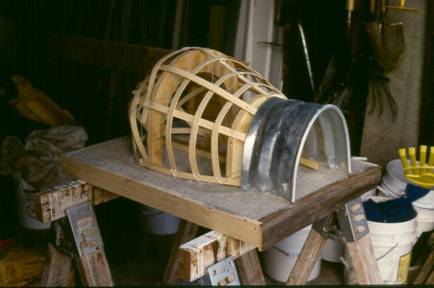
The Framework
From the plywood, cut two C-shaped forms on which to fix the wooden strips. If using branches, bend several branches cross-wise to form the C-shape. NOTE: one C-shaped piece should be approximately the size of the door opening. The other piece should be 1.55 X the height of the door opening at its maximum if you are making a flueless oven. For example, if your door opening is 12" at its maximum, then the interior height of the dome (the height of the larger C) should be 18.6". This will allow the oven to draft properly.
Using the strips (or branches) weave a "basket" that will become the form of the dome. Slip the ends of the strips just inside the door opening. Tie or mail the strips together as necessary to maintain their shape.
|
|
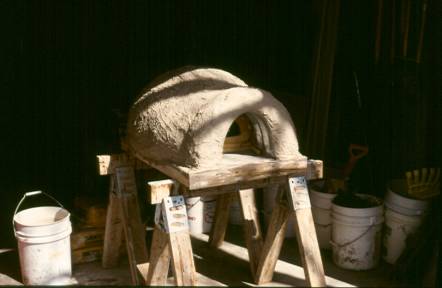
The Dome
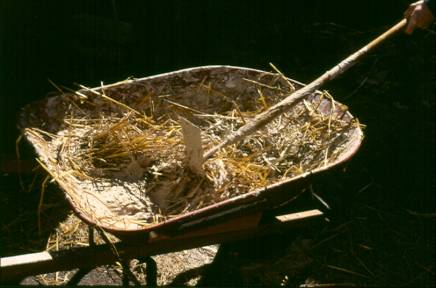
Mix the clay and water until a slightly wet, but workable texture is obtained. Reserve about 1/4 for later. To the rest, add in enough straw to bind up the excess water and form a reinforcing fiber. MIX WELL. |
|
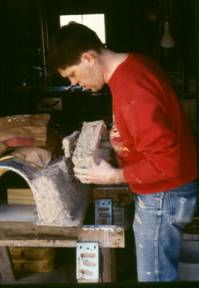
Cover the dome using brown paper bags.
Form bricks, and lay them over the framework building the dome from the bottom to the top. Work the seams of the bricks together to prevent cracks from forming. If you are concerned about your oven venting properly, you can install a vent at the rear near the top by inserting a pipe an inch or two in diameter through the dome. This can be open or closed as needed to create a proper draft through the oven when firing.
|
|
Once this rough dome is formed, cover the entire dome with the clay that you reserved above. This will make a nice smooth surface. You want the finished dome to be at least 4" thick and preferably 6" thick.
Let the dome dry for at least 8 days before firing. If you don't the water in the clay may cause the clay to EXPLODE!
|
|
|
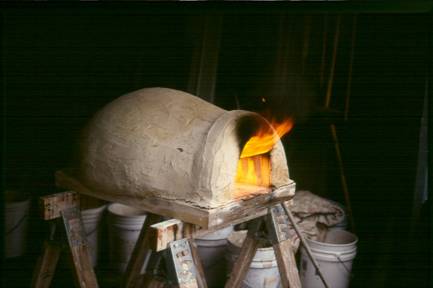
The first firing of the oven will burn out the wooden framework and begin to harden the dome. The dome will harden further with each successive firing. Warm the oven up slowly. You may want to start with a charcoal fire until the dome gets noticeably warm and there is no noticeable steam leaving it. After that, begin to build the fire hotter using small pieces of wood. Hardwoods burn hotter and leave less residue on the interior of the oven. If the oven is venting properly (without a separate vent pipe) then smoke and maybe flame should emit from the top of the door opening while air is taken in at the bottom.
|
|
|
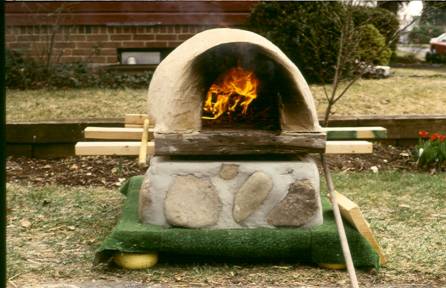
Make a door of a piece of 2" thick lumber about 15" square. YOUR OVEN IS COMPLETE!
|
Baking your bread
| 1. Fire the oven. You may want to begin with charcoal and charcoal lighter, following with hardwood once the fire is lit. It will require a bushel or so of wood, cut into pieces small enough to fit inside the oven. Fire the oven continuously for about 1 1/2 hours.
|
|
| 2. Once the oven is hot, remove the embers with a fire rake (use a small hoe to pull the embers out of the oven), being especially sure to clear a spot in the center for the bread. It is a good idea to have a large disposable roasting pan to scrape the embers into. Otherwise you have hot embers on the ground in front of the oven. The internal temperature of the oven should be between 500 and 600�F. One way to test this is to carefully insert your hand inside the oven and begin counting seconds. You should be able to hold your hand in the oven for only about 15-30 seconds. Shorter than this and the oven is too hot, longer and its not hot enough. |
|
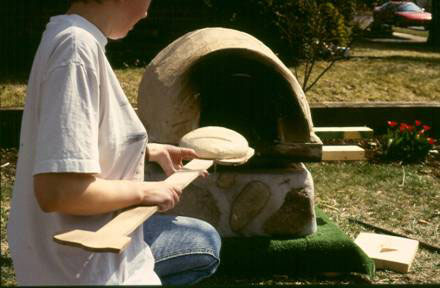
3. With a damp cloth, wipe the ash off the center of the hearth.
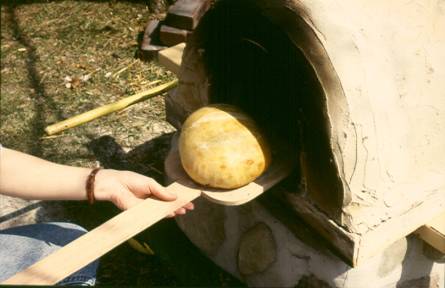
4. Place your bread in the oven using a peel. |
 |
| 5. Cover the opening with your wooden door, and bake the bread about 45 minutes to an hour. The exact length of time will depend on the temperature of the oven and the size of the loaf. |
 |
| 6. Carefully remove the bread with the peel, allow it to cool for 10 minutes and ENJOY! |
 |
Problem Solving Exercises
- What three things could you do if your oven didn't get hot enough?
- What three things could you do if your oven were too hot?
- Why doesn’t the oven get hot immediately?
- Why were the walls of clay ovens so thick?
For Further Exploration
- Why were mills and ovens highly regulated in Medieval Europe?
- What was different about Colonial America that made this regulation
difficult?
- Considering how long it took to make your bread from start to finish
what portion of a colonial homemaker’s time was likely involved
in bread baking?
- Consider how much wood it required to bake a loaf of bread and the work required to get that wood.
- What grains would have been available to the Colonists and how did
this differ from Medieval Europe?
- How would the grains affect the type of bread eaten?
Notes to the Teacher
- Most of the items you will need are available at your local home
supply center.
- It is best to site the oven where the air is still (try to avoid
windy places).
Recipe for a good loaf of oat bread
(from Bernard Clayton Jr., The Complete Book of Bread)
Each of the three loaves of this bread is about the size of an orange.
Ingredients
- 1 ½ cups of rolled oats
- 2 ½ - 3 cups all purpose flour
- 1 package dry yeast
- 2 tablespoons sugar
- 1 tablespoon salt
- 2 tablespoons butter, room temperature
- 1 ½ cups hot tap water (120-130°F)
- Topping (optional): 1 egg white
- 1 tablespoon water
- 3 tablespoons seeds (sesame or poppy seed)
|
Preparation
(15 mins.)
|
In a large mixing bowl, measure the rolled oats and 1 cup all
purpose flour and stir in yeast, sugar, salt butter and water. Beat
in an electric mixer at medium speed for 2 minutes, or for an equal
length of time with a wooden spoon. Stop the mixer. Stir in balance
of the flour, a half cup at a time, first with the spoon and then
by hand. The dough will be a rough shaggy mass that will clean the
side of the bowl. |
|
Kneading
(8 mins.) |
Turn the dough onto a lightly floured work surface – countertop
or bread board – and knead with a rhythmic 1-2-3 motion of
push-turn-fold. The dough will become smooth and elastic. Sprinkle
more flour on the dough and the work surface if the dough continues
slack and sticky. Break the kneading rhythm occasionally by throwing
the dough down hard against the countertop. Knead for 8 minutes. |
|
First Rising
(1 hour) |
Place the dough in the bowl and pat with buttered fingers to keep
the surface from crusting. Cover the bowl tightly with plastic wrap
and move to a warm place (80-85°F) until the dough has doubled
in size. You can test if it has risen by poking a finger in it;
the dent will remain. |
|
Shaping
(20 mins.) |
Turn back the plastic wrap and punch down the dough. Knead for
30 seconds to press out the large bubbles. Divide the dough into
three equal pieces and let rest for 5 minutes. Beat the egg white
and one tablespoon of water together in a cup until frothy (if seeding
bread). Sprinkle the seeds onto a plate or into a bowl. Shape each
part of the dough into a round ball, slightly flattened on top.
Hold loaf in the fingers, brush top and sides with the egg white
mixture. Invert the loaf in the seeds, pressing down lightly to
cover. Carefully place the loaf on the floured tile. With a sharp
knife, cut a cross in the top with two grooves about ½ inch
deep. |
|
Second Rising
(45 mins.) |
Place the baking sheet in a warm place and cover carefully with
a length of wax paper. The loaves will double in size. |
|
Baking
(400°F) |
Preheat the oven to 400°F. Bake the loaves in the oven until
they are golden brown. To test if they are done, turn the loaf over
and tap the bottom crust with the forefinger. A hard hollow sounds
means the bread is baked through. Don’t over bake these small
loaves. Midway in the bake period shift the loaves so they are exposed
equally to the temperature variations in the oven. |
|
Final Step |
Remove bread from the oven and allow to cool on a metal rack. |
Bibliography
- The Complete Book of Breads, Bernard Clayton Jr., Simon and Shuster, New York, 1973
- The Bread Ovens of Quebec, Lise Boily and Jean-Francois Blanchette, Natioanl Museums of Canada, Ottawa, Canada, 1979
- Six Thousand Years of Bread, H.E. Jacob, Lyons and Burford, New York, 1997
- Building Your Own Earth Oven, Kiko Denzer, Handprint Press, Blodgett, OR, 2001
- The Bread Builders, Hearth Loaves and Masonry Stoves, Daniel Wing and Alan Scott, Chelsea Green Publishing, White River Junction, VT, 1999
- The Book of Masonry Stoves, David Lyle, Chelsea Green Publishing, White River Junction, VT, 1984
|